Bread making can be as easy or difficult as you’d like.
Zachary Golper, chef and owner of Bien Cuit, shares his best homemade bread recipes.
To try your hand at making bread, browse the recipes below and make one (or all!)
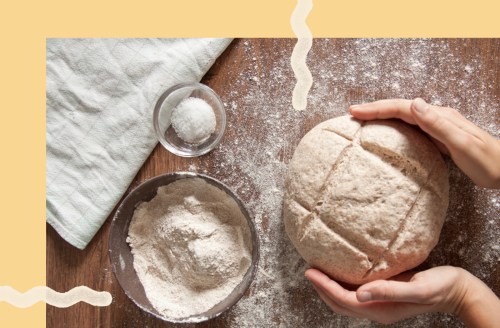
of these thoughtful recipes.
Its about as easy as it gets.
This bread is made usingbiga,which is an Italian word for a non-sourdough bread starter.

…
Itll give you some some interesting notes after about 12 hours of fermentation.
Stir together the white and dark rye flours in a medium storage container.
Sprinkle the yeast into the water, stir to mix, and pour over the flour.

Cover the container and let sit at room temperature for 11 to 15 hours.
The starter will be at its peak at around 13 hours.
For the dough:
1.

Stir together the white and whole wheat flours, salt, and yeast in a medium bowl.
Transfer the starter and water into an extra-large bowl along with the remaining water.
Using a wooden spoon, break the starter up to distribute in the water.

…
Add the flour mixture, reserving about one-sixth along the edge of the bowl.
Continue to mix with the spoon until most of the dry ingredients have been combined with the stater mixture.
Switch to aPlastic Bowl Scraper($8) and continue to mix until incorporated.

At this point the dough will be sticky to the touch.
Push the dough to one side of the bowl.
To roll and tuck, make the dough into a rectangle with the short end facing you.

Continue until the dough is rolled up.
Repeat the process ending with the seam side down.
Repeat this process until the dough feels stronger and begins to resist any further rolling, about 16 times.

Then, with cupped hands, tuck the sides under toward the center.
Gently stretch it into a roughly rectangular shape.
Fold the dough in thirds from top to bottom and then from left to right.
With cupped hands, tuck the sides under toward the center.
Lightly dust the work surface and your hands with flour and shape the dough into a round.
Transfer the basket to the refrigerator and chill for 14 to 18 hours.

Position an over rack in the lower third of the oven.
Place a covered 6-quart, 10-inch roundCast-Iron Dutch Oven($70) on the rack.
Preheat the oven to 500F.
Then carefully transfer it into the pot (the Dutch oven will be very hot).
Score the top of the dough, cover the pit, and return it to the oven.
Lower the oven temperature to 460F and bake for 30 minutes.
Rotate the Dutch oven and remove the lid.
The loaf will already be a rich golden brown.
When the bottom of the loaf is tapped, it should sound hollow.
If not, return it to the oven and bake directly on the rack for 5 minutes longer.
Its not going to feel like other doughs that youve worked with, he says.
Preheat the oven to 425F.
Spread the oats on a half sheet pan and toast for 4 minutes.
Gently shake the pan, then toast for 4 minutes longer.
Shake again and toast until aromatic and evenly golden brown, 2 to 4 minutes longer.
Set aside 1/4 cup + 1 12 tbsp of the toasted oats to make the oatmeal for the starter.
Measure out 1/2 cup to grind into flour.
Set the rest of the toasted oats aside for later use.
This should be about 1/2 cup + 2 12 tbsp.
You will need 1/4 cup + 2 tbsp of the prepared oatmeal for the starter.
Sprinkle the yeast into the water, stir to mix, and pour over the oatmeal mixture.
Cover the container and let sit at room temperature for 10 to 15 hours.
The starter will be at its peak at around 13 hours.
Combine the milk and heavy cream in a measuring cup.
Transfer the starter and milk mixture to an extra-large bowl along with the remaining milk mixture.
Using a wooden spoon, break the starter up to distribute it in the liquid.
Add the flour mixture, reserving about 1/6 of it along the edge of the bowl.
Continue to mix with the spoon until most of the dry ingredients have been combined with the starter mixture.
Switch to aPlastic Bowl Scraper($8) and continue to mix until incorporated.
At this point the dough will be very sticky to the touch and fairly loose.
Push the dough to one side of the bowl.
For this dough you may need more flour, but resist the urge to add it too quickly.
If the dough seems too sticky, let it rest for 5 minutes, then come back to it.
To roll and tuck, make the dough into a rectangle with the short end facing you.
Continue until the dough is rolled up.
Repeat the process ending with the seam side down.
Repeat this process until the dough feels stronger and begins to resist any further rolling, about 10 times.
Then, with cupped hands, tuck the sides under toward the center.
Gently stretch it into a roughly rectangular shape.
Fold the dough in thirds from top to bottom and then from left to right.
With cupped hands, tuck the sides under toward the center.
Turn it over, seam-side up, and gently press on the seam to flatten the dough slightly.
Fold in thirds from left to right and then do one roll and tuck sequence to incorporate the oats.
Turn the dough seam-side down and tuck the sides under toward the center.
Return the dough to the bowl, cover with the towel, and let rest for 20 minutes.
Lightly dust the work surface and your hands with flour.
Gently roll each piece against the work surface to form a ball.
Let rest for 5 minutes.
Make a second cut across the first, stopping at the same point, just before the bottom.
There will now be an X across the round.
Repeat with the remaining two sides to make a square roll.
Fold the linen to create support walls along the rolls on both sides of each row.
Fold any extra length of the linen liner over the top or cover with a kitchen towel.
Transfer the pan to the refrigerator and chill for about 16 to 22 hours.
Line a half sheet pan with aSilicone Baking Mat($8) or parchment paper.
Using the linen liner, lift and ease each roll off the pan and onto your hand.
Set the rolls on the second pan, cut-side up, in three rows of four rolls each.
Put the pan in the oven.
Set the sheet pan on a cooling rack.
This dough recipe is stared with apoolish, which is basically a super wet biga.
This dough is so so so so wet that its very hard to work with, he says.
In the very beginning stages in the folding processthats going to be like folding soup.
Put the flour in a medium storage container.
Sprinkle the yeast into the water, stir to mix, and pour over the flour.
Cover the container and let sit at room temperature for 10 to 15 hours.
The starter will be at its peak at around 12 hours.
Stir together the flour, salt, and yeast in a medium bowl.
Using a wooden spoon, break the starter up to distribute it in the liquid.
Add the flour mixture and stir vigorously with a wooden spoon for 1 minute.
Cover the container and let the dough rest for 45 minutes.
Using the scraper, release the batter-like dough from the bowl and onto the work surface.
Lightly dust the second storage container with flour.
Cover the container and let the dough rest for 45 minutes.
Transfer the container to the refrigerator and chill for 12 to 18 hours.
The dough will spread on its own.
Divide the dough into two equal pieces and gently coax each piece into a rough rectangle.
(The amount of time can vary significantly depending on the temperature of the room.)
Dust one finger with flour and press it into the dough.
The imprint should remain.
If it doesnt, leave the dough to ferment until it does.
Line two half sheet pans with parchment paper and dust with the dusting mixture.
Position the first lined pan close to one piece of the dough.
Uncover that piece of dough, leaving the second piece covered.
The next steps are done as a series of consecutive events.
Gently flip the first piece of dough over onto your hands.
Place it on a sheet pan.
Be sure to keep the second piece of dough covered while the first one bakes.
Put the pan in the oven.
Carefully transfer the loaf to a cooling rack.
When the bottom of the loaf is tapped, it should sound hollow.
If not, return it to the oven and bake directly on the rack for 5 minutes longer.
Carefully remove the skillet and pour out any remaining water.
Set the skillet back on the lower rack and let the oven temperature return to 480F (250C).
Bake the second loaf in the same way, again using about 3 cups of ice to create steam.
Let the bread cool completely before slicing and eating, at least 2 hours.
This bread is best eaten the day it is baked.
…
Got it, you’ve been added to our email list.
